I led the end-to-end design direction of this feature, collaborating closely with stakeholders and team members to define the customization process. The final design received outstanding feedback from stakeholders, and the feature is currently in the development phase.
Team
Kiran Kumar (Designer)
Anshuman (UX Writer)
Aakash Nair (Product Manager)
Harish (Front End Developer)
Timeline & Status
Highlights ⚡
An end-to-end experience for customizing invoice templates using a drag-and-drop editor and HTML import.
The Backstory
Chargebee is a subscription management system (SMS) that helps subscription-based businesses manage the entire subscription lifecycle. It can automate tasks like invoicing, recurring billing, and payment processing, which can save time.
Invoice was one of the main modules in chargebee which brought in a lot of high value customers, but it also lost some because it didn't have all the features they needed. Currently, Chargebee provides a very rigid invoice template where the merchant has minimal control over what is displayed and how it is displayed.
How it all started?
It began as a small hackathon idea during Chargebee's in-house event, #chargeup, in June 2023. We created an invoice customization feature using a 3rd party tool called "Unlayer". From this initial idea, we developed it into a fully-fledged feature.
Around July 2023, after the hackathon ended, our weekly team call took an exciting turn. Our Product Manager (PM) introduced us to this feature and its requirements. Our team, consisting of one Product Manager, one UX Writer, and a dozen software and QA engineers, had a clear objective: to make it easier for merchants to customize their invoice templates without relying too heavily on Chargebee.
During the call, our Program Manager shared the research findings he had gathered. Together, he and I swiftly reviewed the data to identify the key issues. This kickstarted our discussions on what needed to be addressed and how we could tackle these challenges.


Merchant Request: ”Show Company Name before Customer Name in Billing and Shipping Address. Similarly show Zip Code before City.”
If you take the Billing address, there are two parts to it:
Label of the field (Billed To) — Static Text
The fields that make up the Billing address (Name, Company, Address ) — Dynamic text
To better address this, we considered how we've solved Organization Address formatting
The tool restricted us to adding only five custom CB components, hindering our ability to fully implement our desired features.
Even after adding custom components, Unlayer displayed raw HTML instead of offering the expected customization options, complicating the process for the user.
Research — In search of a better solution
Since the initial approach using Unlayer didn't appear to be the best solution from a user's perspective, we aimed to adopt a more user-centric approach. Forgetting about what we could do, we focused on discovering:

"What do customers want to customize in their invoice templates?"
"Why do they want to make these customizations? Why is it important to them?"

"How do they prefer to make these customizations?"


Key Customer Insights — What?
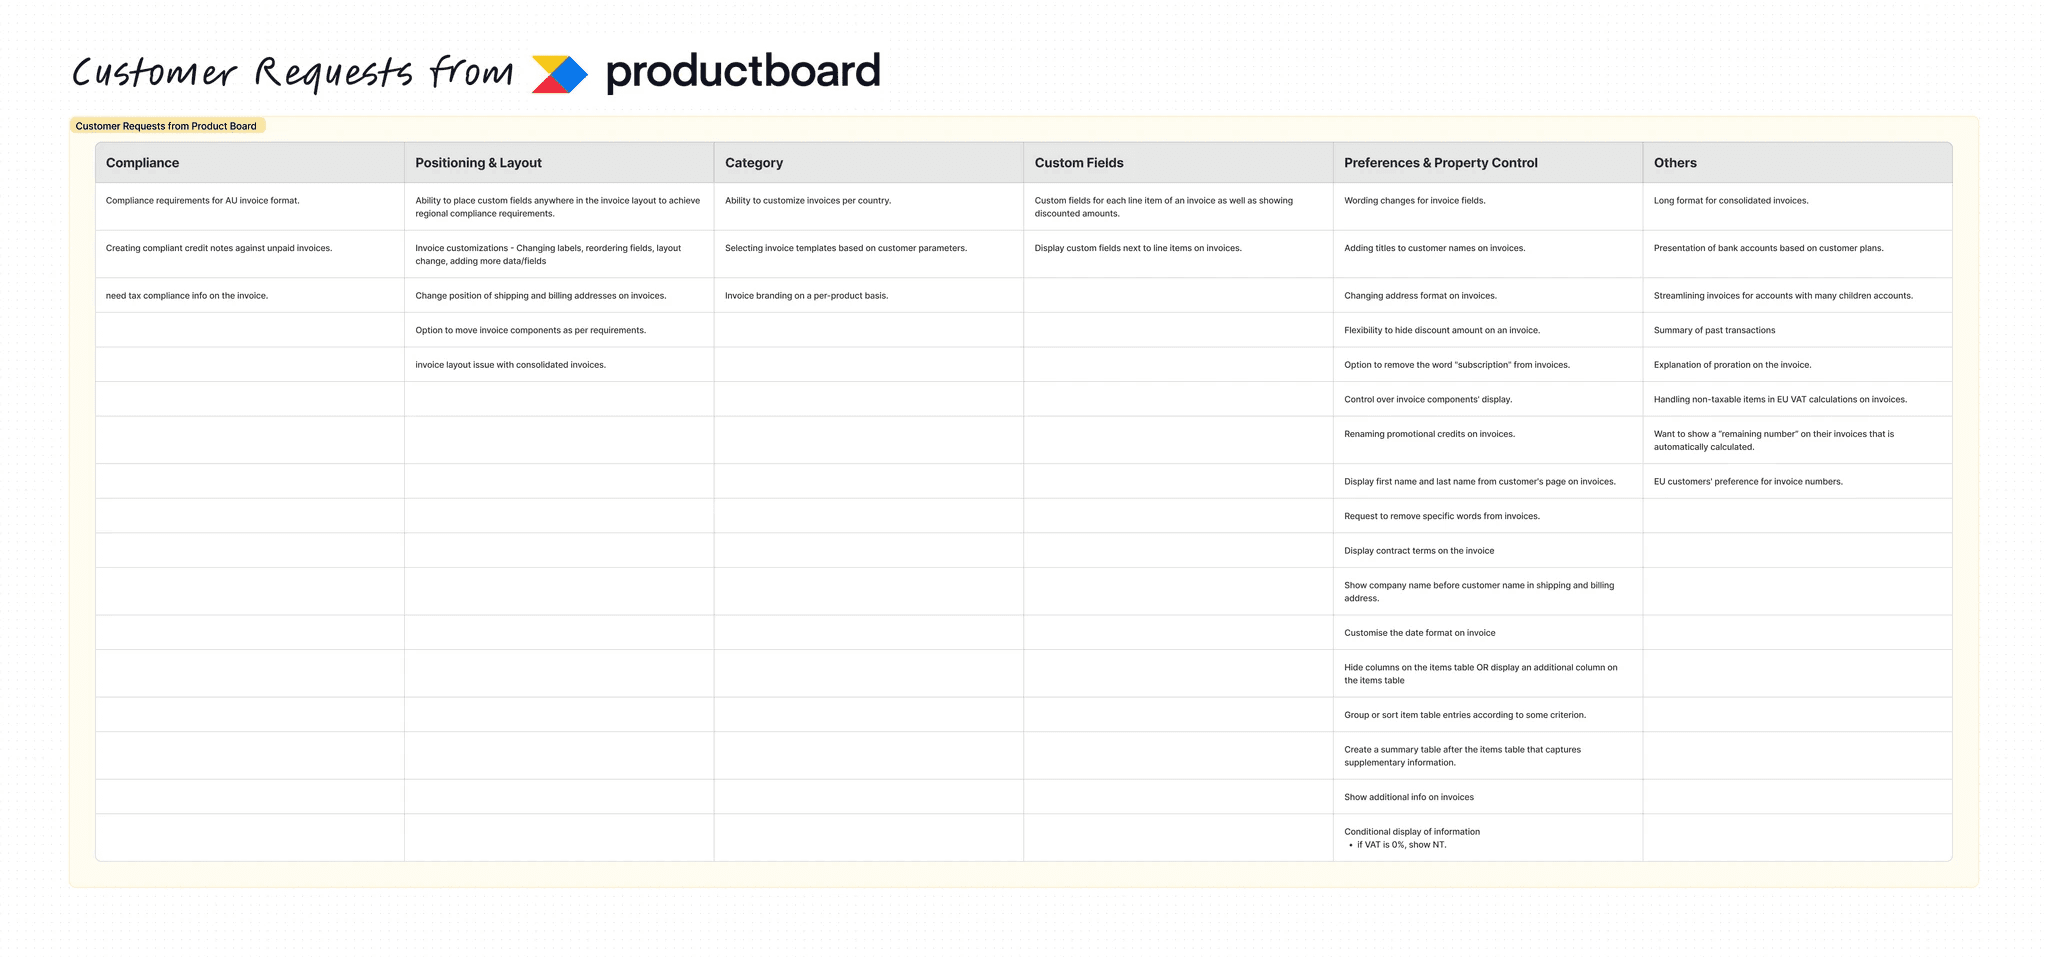
Users want a high level of control and flexibility over the appearance and content of their invoices. Like displaying additional custom fields, changing labels and layouts, hide irrelevant data, and effectively group and sort information within tables. These insights highlight the importance of empowering users with versatile data manipulation capabilities.
Users want to customize invoices per country and ensure full compliance with regional regulations.
Users seek internationalization (I18n) features for invoices, including customizable invoice language, as well as flexible date and number formatting options to cater to diverse global audiences.
Key Customer Insights — Why?
Many customers require specific layouts and content in their invoices to comply with regional financial regulations.
Businesses want to customize their invoices to align with their branding and white-labeling requirements.
Some customization requests stem from unique business requirements.
Research — Conducting a Workshop
The goal of the workshop was to determine how customers prefer to customize their invoices. To gain fresh perspectives, I organized a small workshop with other designers. We wanted new insights on the project to better understand customers' preferences for customizing their invoices.
Day 2 - On the second day, we were still figuring out how to implement this feature. The user requirements were diverse, and we wanted to provide a simple solution that wouldn’t overwhelm or complicate the user flow.
In this scenario, the user would specify what they wanted, and Chargebee would respond with the steps the user needs to take. This new approach helped us determine how customers prefer to customize their invoices.

Proposed Solution — The New Approach
After doing the research and creating journey maps, we created an approach where the user can create or customize invoices with ease.
Testing with the Experts
With the design approach we got from the workshop, i turned it into a proper UI design and took it for testing with major stakeholders for getting feedbacks. While everyone liked the approach, we got a few important feedbacks,
The main feedback we received was to include an HTML import feature, which is preferred by Grow and enterprise-level customers.
Some also felt that the UI and overall flow were too complicated due to the number of steps involved.
Final Designs
An improved version of the Drag & Drop Editor and the introduction of HTML Import, based on feedback.
Revamped Invoices Page
We revamped this page by removing the settings that we didn't need any longer.
Visual / HTML editor
Merchants can create an invoice in two ways: by using a drag-and-drop editor or by importing a HTML template.
Template Properties
Merchants can set up the basic requirements for their template here, such as giving it a name and configuring regional settings like compliance and language.
Compliance Feedback
Based on the selected region, all compliance details for that country will be displayed to the customer. If any settings are not configured, the merchant will be notified about it and can configure them now.
Drag & Drop Editor
Once the properties are set, the merchant can come to the editor page, where they can drag and drop, modify, change layout and remove the sections they want in their invoice.
Styles Page
Here, merchants can set basic styling elements such as typography and colors for the invoice.
Drag & Drop
Merchants can drag and drop a section into the template wherever they desire. When they attempt to drop it, easy-to-follow guidelines will assist the user in precisely placing it where they intend
Section Editor
when a merchant adds a section to the template, the section editor opens automatically, allowing the merchant to customize the section according to their needs.
Final Step - Preview
1. Once they have finished customizing the entire template, it's time to preview it right? To enhance the preview experience, they can select a customer from their database to view an preview with real data.
2. They can also send a test email to their own email address to preview how their end customers will receive the invoice.
3. As an additional feature, we also encourage users to customize email templates.
HTML Import Flow
Choosing an editor
Merchants can choose the HTML editor when they want to import an HTML file.
Template Properties
Merchants can import their HTML file here and set up the basic requirements, such as giving it a name and configuring regional settings. However, since it's an HTML file, they cannot choose a language here.
Design & Compliance
After their file is rendered, they will be able to view their design. Additionally, they will see their regional compliance details once they select a region here.
HTML Editor
Once the properties are set, the merchant can come to the editor page. If they wish to modify, change anything in their design they can edit their HTML code directly from the editor itself. This saves them time from editing the original file and uploading again.
Mergevars Tab
Since all fields in the invoice are mergevars, merchants require a list of mergevars to modify their HTML code. They can easily copy the mergevars from this tab and directly integrate them into their code.
Final Step - Preview
1. Once they have finished customizing the entire template, it's time to preview it right? To enhance the preview experience, they can select a customer from their database to view an preview with real data.
2. They can also send a test email to their own email address to preview how their end customers will receive the invoice.
3. As an additional feature, we also encourage users to customize email templates.
Invoices page
Once a template has been created, it will appear in their templates list. We include a code icon in the template card to differentiate between HTML and drag & drop templates.
Prototype
Please use the full-screen view to have a better experience :D
Fighting Battles
While Unlayer is a great tool for customizing layouts, and it is probably possible for our users to achieve whatever they want to do with it. However, the limitations of the tool compromise usability in key areas like user freedom, error handling, etc. Additionally, it would be difficult to add support for crucial functions such as compliance and localization in a way that is meaningful and seamless. Lastly, it is not clear how the proposed solution with Unlayer will handle requirements such as consolidated invoicing and other special requirements that may come up in the future.
After finalizing our ideal approach, it was time to decide how to proceed. The design team proposed a solution without using third-party tools, while developers preferred Unlayer for building the feature.
This sparked debate, with both sides presenting their pros and cons. As a designer, my focus was on advocating for the users' needs.
Unlayer didn't offer a satisfactory user experience; it had numerous usability issues and failed to address all user pain points.
For every problem we want to solve, we have to see how it can be done in unlayer instead of seeing how the user would want to do it.
To strengthen our argument, we conducted a comprehensive UX analysis comparing Unlayer to our designs. This document highlighted every problem with Unlayer and demonstrated how our designs could overcome them.
Conclusion — Getting Green Light
While everyone loved the approach i presented, the efforts and time required was high and the team wanted to go to the market faster. So we were stuck here.
At the end of the day, everyone wanted what’s best for the customer. And we had solid proof of customers wanting this feature. So we made the bold decision of taking this to the leadership team, in our regular monthly call.
This is where everything turned, the leadership team loved our approach. Thanks to all the data we showed, the leadership was impressed with everything and gave us the green light to plan this effectively and take it to the market.
Next Steps
With approval granted for our chosen approach, we began strategizing the step-by-step implementation process. Currently, this feature is progressing through the development phase.


